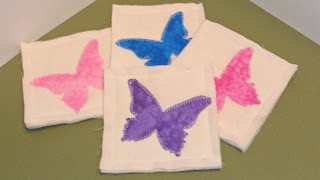
I decided for this challenge to go with fabric coasters. I used muslin and scraps of quilting batting in a standard 4 x 4 square size. I used a glue stick to hold the butterfly down before I used a Zig Zag stitch to adhere the butterfly down. I not much into applique mostly since I'm not that good at it but the zig zag stitch hides a lot and lets you fudge more than hand stitching. I then added the batting and the back layer of muslin and used a straight stitch to complete my project I trimmed the edges as needed. These would make a great house warming gift and take very little time just tie a ribbon around them for that finished look.
Saturday, February 26, 2011
Tuesday, February 22, 2011
CCMC-OM4 Sketch challenge
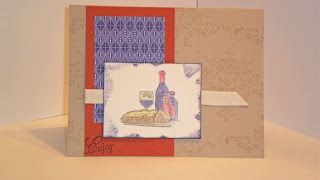
This was this week's sketch challenge on Create with Connie and Mary's on line class. I love how I'm being challenged and all the inspiration I have gotten.
I used Studio Sketches, bliss, and You're a Gem stamp sets. Ink pads versamark, concord crush and black staz on. I also used the 6 x 6 hostess paper pack, watercolor crayons and twill tape, and dimensionals.
I really wasn't sure what I wanted to do with this sketch but I did know I wanted to make a card and I wanted it to not be girly girly since I seemed to be in that rut and wanted to do something different. I haven't figured out yet why I have such a hard time when I'm told which direction to go it's seems that I fight the design more than ever.
Monday, February 14, 2011
CCMC-OM3 Tea bag box
This was this week's challenge to use Rose red, Baja breeze, Pear Pizazz, and very vanilla. Originally I was going to make a totally different box but I got an email with the directions to make this from Andrea Walford and I just had to make it! I love the fact that this tea bag holder holds more than 1 or 2 bags which is a waste of time IMO.
The most challenging was making the roses out of card stock verses using fabric. I know if I don't tell you how I made them I will not hear the anything else so here I go. I'll try to explain in a way that makes sense but email me any questions.
I punched out a scalloped circle and cut out the center. I then folded down the scallops and broke the fibers of the cardstock to make it more movable. I then ran a thin line of liquid glue (tombow) and let it dry for about 10 min. I then used my reverse tweezers and rolled it up and held the flower for a min to set it. To make it open I forced it with my finger nail and used the piercing tool to place the pearl in the center. I attached it to my project with a glue dot.
The leaves are from the 2 step bird punch and I sponged them with crumb cake and pinched the leaves to give them more depth. You can add more tea bags from the bottom but it is easier to place them inside the box before attaching the lid.
Thursday, February 10, 2011
The Changable Memory Board
The template for this memory board was from Connie and Mary's challenge this week. I decided to make something other than a card go figure. I used a clipboard I had on hand and drilled 2 holes in the bottom and put two 6" bolts through the holes and secured them with nuts.
I used the newsprint dsp and the big shot for the large scalloped circle in always artichoke and the next size smaller for the cherry cobbler on the flower the inside of the flower is black cs punched with the scalloped circle. I then got them wet and crunched them up and used a antique brad in the center.
The words are from hope happens and they are my personal goal to live by. The chocolate chip ribbon was rucked the old fashion way with a running stitch and attached to the back with a dimensional and the bottom with a glue dot. I did a lot of sponging to give dimension and even a little bling with the shimmery paint and the pearl on the humming bird.
This project is great to hold your recipes while you cook, your favorite picture or card you either made or received.
Friday, February 4, 2011
This is for Erin
I had to post a card that is just so Erin due to the use of Crumb Cake. It's her favorite color but I wanted to show off the bliss blue and early espresso that was used with it. And yes this one is inspiring me to use more of our buttons I'm such a button hoarder! I have to remember that it doesn't have to be an exact same button for my classes (I can't seem to get over that but I'm trying)
Thursday, February 3, 2011
Sell a Bration
This card is so great the texture again as always get me every time. I love the baha breeze with a touch of Rose red they work together without overpowering the other. The pearl adds an elegant touch and the ribbon ties it all together. I love the scalloped oval with the scalloped edge I also like that you don't need a perfect rectangle to use the corner scalloped edge punch by adding a layer! What a wonderful idea.
Wednesday, February 2, 2011
A Soft and Elegant Birthday card
I don't know if it's the colors that are drawing me to this card or the added texture with the embossing folder but I love this card. The die cut flower is getting to be a must have for me. How about for you? You can find it in the Occasions mini on page 39. I can't believe how many things are in this mini every time I look I see something new that I just have to have. Thank goodness it's sell a bration and I can get more than I normally do!
Handmade Party favor
I love a party favor that I know will not go in the trash. I filled this pouch with a chocolate but it can be latter filled with lavender for a sachet. I love the new fabrics that SU is offering. You do not even have to be a great sewer for this one! The hardest part is the yoyo which is just a circle that is hand sewn with a gathering stitch, cinched and tacked onto your pouch. IMO the ribbons and a button add so much personality and you really only need a scrap of ribbon for the top of the pouch. Add a personal thank you with SU's tag die folded in thirds to be inside the pouch mentioning the reuses of your pouch.
Tuesday, February 1, 2011
A Present card
Subscribe to:
Posts (Atom)