The color challenge was Real Red, Wild Wasabi, and Cherry Cobbler. I found this challenge easy to put together being that I've been creating alot of Christmas cards lately besides Cherry Cobbler is one of my favorite colors and foods to eat. Too bad it's not on my diet and Zumba plan to loose another 20 pounds. I'm really glad that I joined the Create with Connie and Mary Holiday edition because it's keeping me on track to post on my blog even with me working full time and doing at least 5 hours of Zumba a week. I love all the ideas that are being shared and the instructions are right on. I'm hoping to create most of the ideas while I'm on vacation starting October 31st.
Thursday, October 20, 2011
Monday, October 10, 2011
CCM- A I will only make one Christmas Card
I love this kind of challenge mostly because I thrive on over the top wow cards but to be honest I would make more of this card only because it's easier than my pergamano cards. Any card that takes less than 2 or 3 days to make is something I will do again. Crazy I know but making cards like this lets me breath and relax in my life and I love making them!
Since I wanted to keep all the product Stampin'UP! that made me do something other than pergamano so what to do OK I love working with vellum why not pierce it into a frame. Now to find the best fit inside the frame the bells and boughs stamp set was a perfect fit in fact it looked like it was made for this card. Now the problem is how to attach it without making the vellum crinkle from glue. Oh I know some clear rhinestone brads and glue on the back of the vellum where it won't show.
My card need alittle extra so I added layers and hand cut them out attached with dimensionals and for the finishing touches I added the silver glass glitter with crystal effects and a white taffeta ribbon. Even though I'm crazy enough to make several of this card most are not so I believe this will qualify for the challenge. What do you think?
Tuesday, October 4, 2011
I also added a 3d item
I like the large buttons but I wanted to do something different and magnets where it. I didn't have enough time to sew this week so that limited me on my options but that didn't stop me. I also love to use up my extra bits of ribbon and dsp. I love the falling leaves stamp set and how you can use it for fall or even masculine cards.
Create with Connie and Mary Holiday ed. Color
Tuesday, September 20, 2011
Brad earings
What a great gift for Christmas or a special friend's birthday! I love the matchbox die it really makes this project a wow by making a mini pedestal on top. The brads are the antique and the back of them where cut off and sanded and attached to french hooks. The paper on the matchbox die is from beyond the garden and the mini brads where used in the flower centers.
Thursday, September 15, 2011
Hello Doily
This was on display board at the downline meeting I went to. I love the look of black and white and the pink satin ribbon is just the right softness to finish the card off right.
Stamp the doily in veramark and wet emboss with white embossing powder. Cut and mat the pieces in pretty in pink and thread the ribbon through the center.
Saturday, September 10, 2011
Unique Corners
Please forgive the picture of a picture but I had to show this. What makes this a wow is looking at your punches in a whole new light instead of just punching shapes why not see what else they can do?
This card is framed with the decorative label punch and it will always match for layering since the card stock can only go in so far on the bottom but not the top of the punch.
Sunday, September 4, 2011
Need a Bear Hug?
I really like this bear he looks as if he's ready to give you a great big hug. When making this card you might want to consider making a full sheet of the background and make several cards at once. I find it especially helpful to me to have several cards on hand so they are ready to go when I need to send a card out quickly.
I love the fake brads under the bear it's just 3 hole punches showing the matting. What a great way to save time and money by using what is already in the card's design. The colors are night of navy, crumb cake and soft suede.
Wednesday, August 31, 2011
Presentation is everything!
You can give a candy bar to your coworkers as a inexpensive gift but unless you dress it up they might not go crazy for the idea and think you don't appreciate them much. This presentation will save the day. My mom has always said that if you don't spend the money spend the time to make a gift special! The water coloring is easy if you remember to slap the color on and forget about staying in the lines and it's made so much easier with the watercolor crayons and the water pen.
Tuesday, August 30, 2011
Bringing Baby
I love the vintage look and this image is just perfect for that look.
The first edition DSP is torn and aged with sponging and the tag in the new in color of pool party gives it that pop.
The seam binding ribbon is soft and just gives the finishing touch. The other stamp set used is the Elements of style.
Sunday, August 28, 2011
A new way to look at a stamp set
If your still trying to decide on a Christmas stamp set might I suggest the most versatile set in the Stamping Up! catalog the Pennant Parade. This is a stamp set that was available to demonstators on the preorder and I almost didn't get it can you believe that! As usual other demonstrators came up with ideas that made me go wow!!
This stamp set can make an ice cream cone, a Christmas tree, a banner and as you can see a sail boat too! I'm sure I'll find other ideas as the year goes on. Of course I found this idea out after I bought a baby stamp set that I'll feature next oh well more toys to play with and to keep my creativity going.
Tuesday, August 23, 2011
Simple and elegant wedding
I've seen tux cards before but the details in this one just make it a wow. The button is done with the big shot die sweet buttons so you never run out of the color and the size of button you choose.
The lapel flower is made with the bird builder and the bitty shapes punch pack. The hardest thing on this card is the hand cut bow tie but I would change it to the black satin ribbon if I had to make several of these besides I can't draw at all which is why I love rubber stamping.
Friday, August 19, 2011
Back to School already
Friday, August 12, 2011
Out West
This card is an example of why you need stamping friends to trade ideas with. I never would have thought to put these colors together and the focal point is amazing! To make it just take a scalloped circle punch and some baker's twine and tape the end to the back of the card and wrap it around until you have covered all the scallops. The antique brad in the center gives it a finished look as well as a western flair. It reminds me of a spur and really fills in the card without being too busy.
Tuesday, August 9, 2011
Christmas Pedestal
This is a standard pedestal card with a twist instead of a rectangle easel look you get a unique look with the big shot's large scallop circle die. The poinsettias are made with the 5 petal flower punch and the centers are the circle rhinestone brads that have been taken out of the brad. The brad ribbon on the bottom is what holds it up in the display mode. The finishing touch is the smooch spritz in gold glow.
Friday, August 5, 2011
Don't throw away those container!
I love the reuse of something that I always have on hand and this fits the bill to a tee.
You will need a big shot to make the scalloped circles and the embellishment container is wrapped with ribon. The top is decorated with the triple layer punch and the bling is the rhinestones.
You can fill the container with candy and have a great gift that is quick and easy got to love that!
Monday, August 1, 2011
Snowman Christmas
This card is all about the details. The ribbon with a glitter brad and the tag pull with the baker's twine.
I love the added color on the embossing folder petals a plenty to achieve the open center for your snowman you could cut your embossing folder or make a frame with some chipboard.
To make the ribbon brad make a loop like the breast cancer sign and use the open brad to make the wings of your bow. This works great if I'm not around to make your bows :)
Sunday, July 31, 2011
OMG it's almost time for Christmas
First I want to say I'm sorry that I haven't posted in awhile due to the heat and my workout schedule I thought I had more postings set up. Can you believe that it's the last day of July and I had to already select my mini catalog mailings!
I love this card it was shown to me at Sherri's down line meeting I will be featuring cards from her swaps at convention this month all of them beautifully done.
This card shows our new set so much fun and the triple layer punch and my new favorite border punch Lace ribbon. The simple colors and traditional Christmas just calls to me. The most common question I have had about this card is the Lace ribbon How do I attach it you can use any glue but I find the liquid glue pen is great with the least amount of clean up.
Monday, June 27, 2011
Dsp and punches
Need a card in under 5 min. I know I do more often than I want to admit. This is the card for you all you need is a piece of dsp and a strip of cardstock punched with the eyelet border. I added the words from the happy greetings and punched them with the scalloped oval and adhered it to the large decorative label punch. The bow was added to make it look like the card took more time than it really did and gives it that finishing touch. You can use this template for any card and change the words for any occasion. You could even turn the card for a whole different look. Got to love that!!
Wednesday, June 22, 2011
Wet embossing
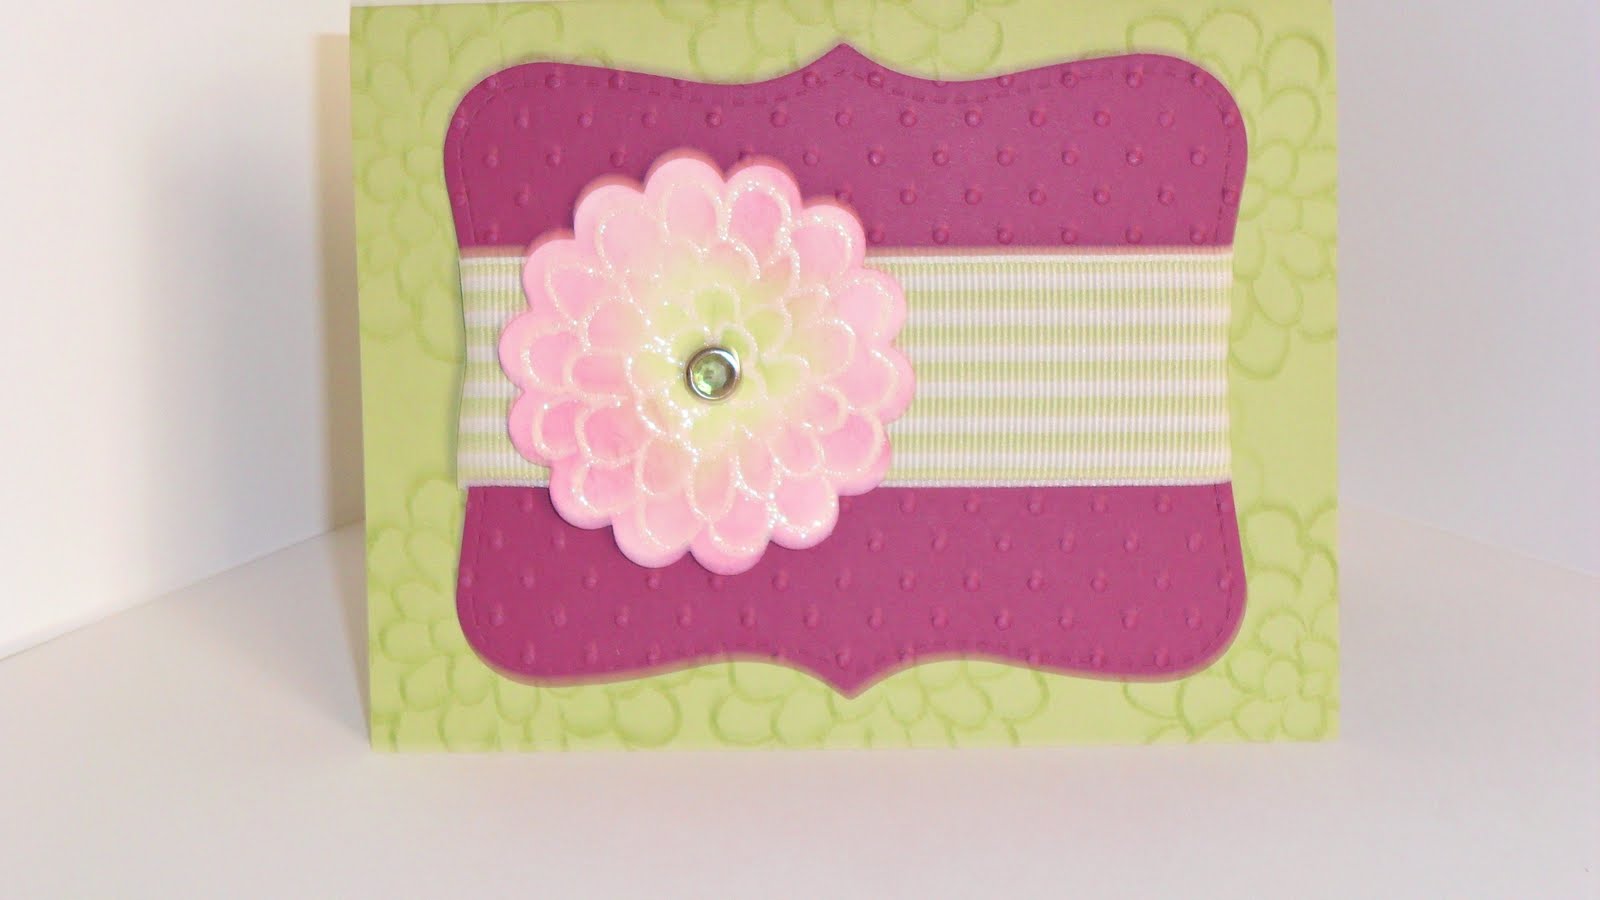
The stamp set is flower fest and I'm liking it more and more as I see what you can do with it. I especially like that the images match my punches and make it so easy to put a card or scrapbook together. Want a glittery embossed image without the glitter falling off mix a spoonful of white embossing powder and a spoonful of glitter and you to can have this look. After the image was embossed and punched out with the matching punch I added chalk with a cotton ball to give the flower 2 colors. For that added bling I added a rhinestone circle brad. To fill the card up since I only used 1 flower I stamped the background with the same image in old olive and used the top note die and the embossing folder perfect polka dots in rich razzleberry card stock. the ribbon is the Old Olive 1 1/4" grosgrain and adds that extra texture.
Subscribe to:
Posts (Atom)